I figure I might as well start writing this now, since it'll help a lot of people.
I'll be documenting the use of three different programs. Two of them you have to pay for, but one of them is free. The two purchasable ones are Animation Shop and Adobe Photoshop. The free one is The GIMP.
However, you can download trials of the purchasable programs, and I'll also provide a link to where you download The GIMP, which is a bit more complicated to download and install.
The first tutorial will be put up now, with images.
I'll be documenting the use of three different programs. Two of them you have to pay for, but one of them is free. The two purchasable ones are Animation Shop and Adobe Photoshop. The free one is The GIMP.
However, you can download trials of the purchasable programs, and I'll also provide a link to where you download The GIMP, which is a bit more complicated to download and install.
- Animation Shop's trial version is available from Jasc's website. I'm not sure if it'll allow the feature I use to add transparency as I have the full version.
- Adobe Photoshop's trial version is available from Adobe's website. I'm pretty sure the trial will have the feature I use to add transparency, but again, I have the full version.
- The GIMP is available from TheGIMP.org for free. Note that it is available for most operating systems. For Windows you need to download the GTK runtime as well. Make sure to choose the one appropriate to your operating system.
The first tutorial will be put up now, with images.
[size=30pt]The GIMP Tutorial[/size]
Okay, so first off, we have the interface for The GIMP. It's a slightly more complicated program than most, in that it doesn't just hand features to you on a plate: you have to figure them out yourself, for the most part. It took me a while to get used to, and I still prefer Photoshop, but it's a good program.
For now, I'll only show the tool and canvas windows, because we don't need the layers/channels/paths window for making things transparent.
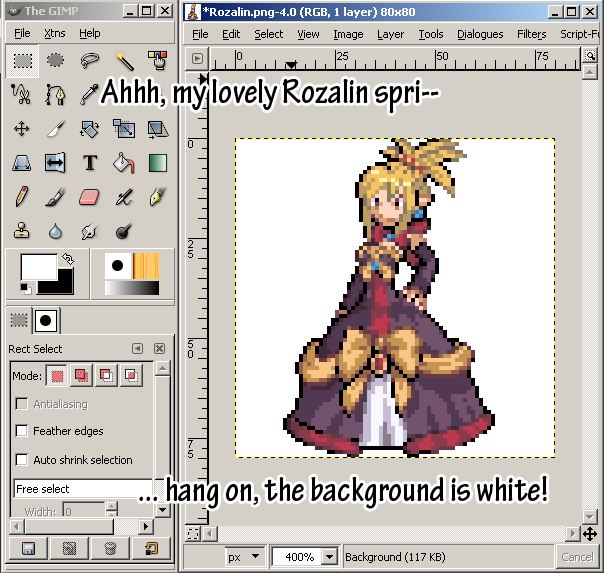
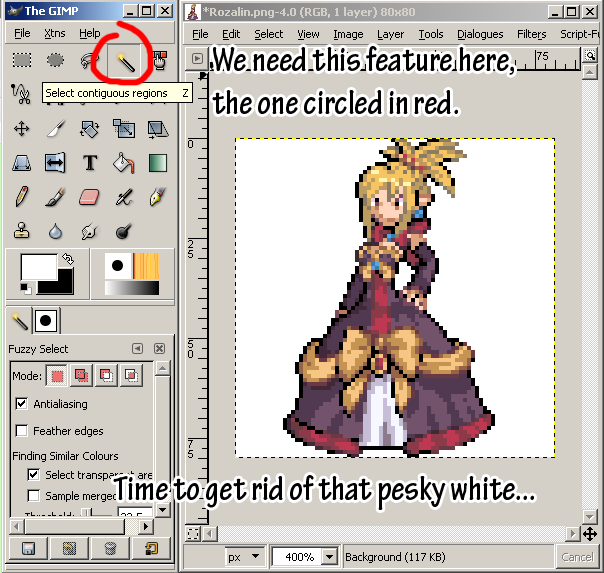
White background? We can't be having that! ... But hold on, there's a way to fix this. Select the Magic Wand, either by pressing Z, or clicking it on the Tools bar.
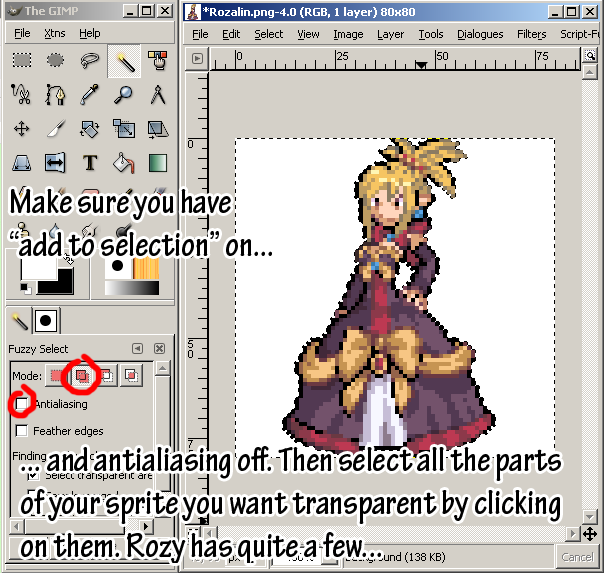
For the next step, you need to either hold the Control key, or push the "Add to current selection" button (I'll have it pushed in my screenshot), and make sure to turn off antialiasing. Most sprites aren't antialiased, so we don't need it.
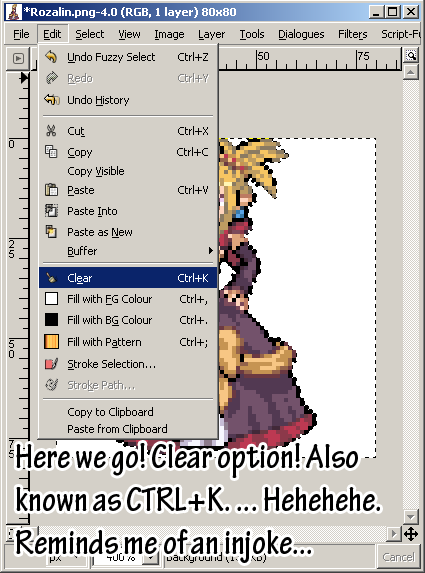
The last step is actually quite simple... There's a drop-down box in the canvas window, with an Edit option. Click it, and go down to Clear, as shown here:
Of course, when you click that - poof! The white bits you selected will be gone, as the image will now have a transparent background. It's like magic!
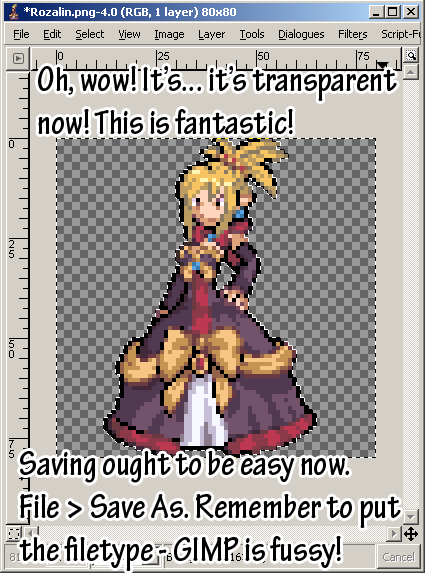
The resulting sprite is here:

Unfortunately, PNG transparency works in limited browsers, but I think the two main ones are the most up-to-date version of Internet Explorer, and also Firefox. I myself use Firefox, not sure what browsers can't handle PNG transparency because I haven't checked.
Keep in mind, however, that the only filetypes you can use when making a transparent image is .gif and .png, and .png is favoured, especially if you're submitting to the Trainer Card Maker.
Okay, so first off, we have the interface for The GIMP. It's a slightly more complicated program than most, in that it doesn't just hand features to you on a plate: you have to figure them out yourself, for the most part. It took me a while to get used to, and I still prefer Photoshop, but it's a good program.
For now, I'll only show the tool and canvas windows, because we don't need the layers/channels/paths window for making things transparent.

White background? We can't be having that! ... But hold on, there's a way to fix this. Select the Magic Wand, either by pressing Z, or clicking it on the Tools bar.

For the next step, you need to either hold the Control key, or push the "Add to current selection" button (I'll have it pushed in my screenshot), and make sure to turn off antialiasing. Most sprites aren't antialiased, so we don't need it.

The last step is actually quite simple... There's a drop-down box in the canvas window, with an Edit option. Click it, and go down to Clear, as shown here:

Of course, when you click that - poof! The white bits you selected will be gone, as the image will now have a transparent background. It's like magic!

The resulting sprite is here:

Unfortunately, PNG transparency works in limited browsers, but I think the two main ones are the most up-to-date version of Internet Explorer, and also Firefox. I myself use Firefox, not sure what browsers can't handle PNG transparency because I haven't checked.
Keep in mind, however, that the only filetypes you can use when making a transparent image is .gif and .png, and .png is favoured, especially if you're submitting to the Trainer Card Maker.
[size=30pt]Animation Shop Tutorial[/size]
Animation Shop's trial version is available from Jasc's website. I'm not sure if it'll allow the feature I use to add transparency as I have the full version. But, let's see what we can do with this! We'll start off with the interface, like with The GIMP.
I don't know if the interface has been updated recently, but I use version 3.
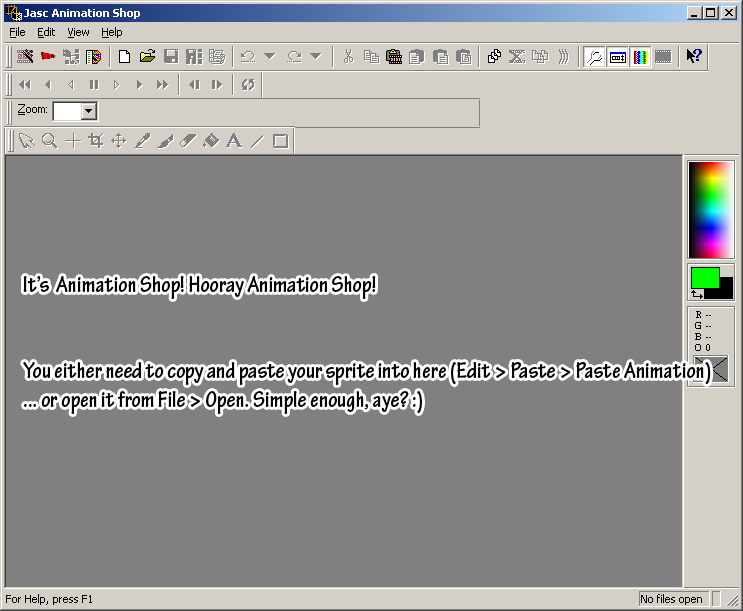
Once you've got your sprite in there, you'll have it up, and it'll look a bit like the following...
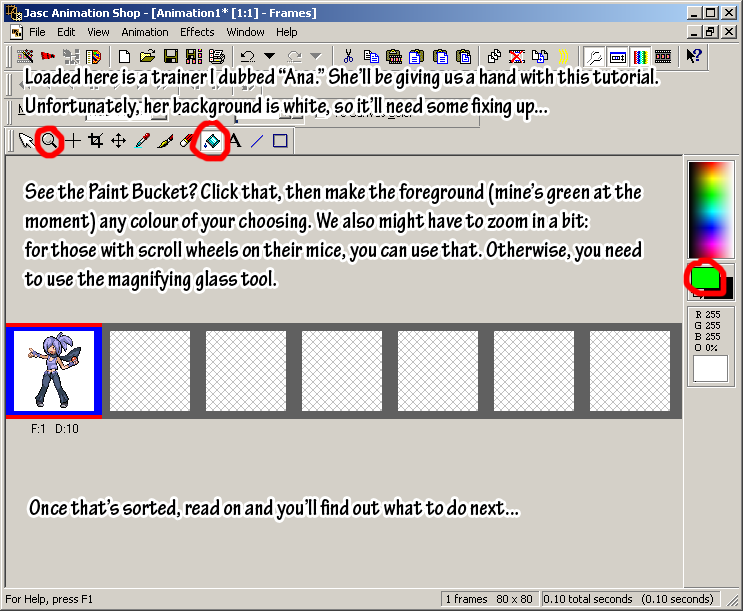
The best way of making things transparent in Animation Shop is to use the Replace Colour tool. But keep in mind that when you do this, it replaces every instance of a colour on the image. So that's why I selected the green - it's not used on my actual sprite, so it's safe to make a transparent background with!
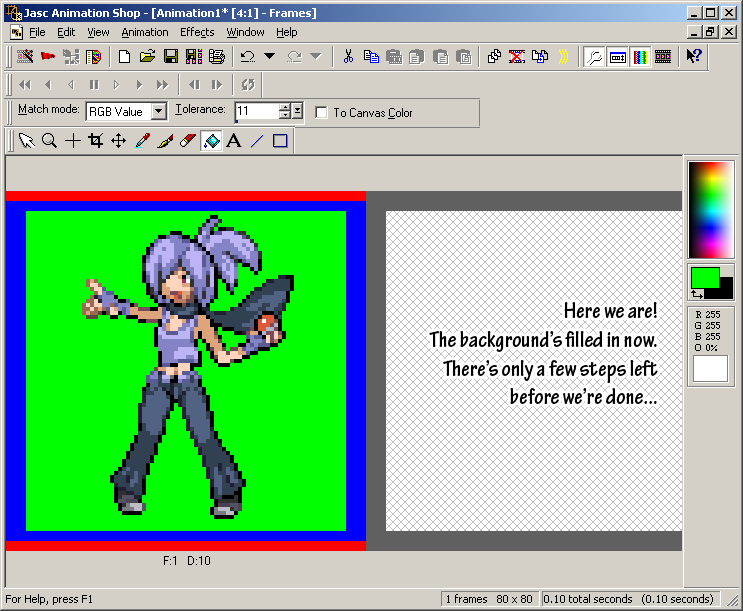
The next step is to use the Replace Colour tool, in the Animation option. You'll get an option box come up when you click it:
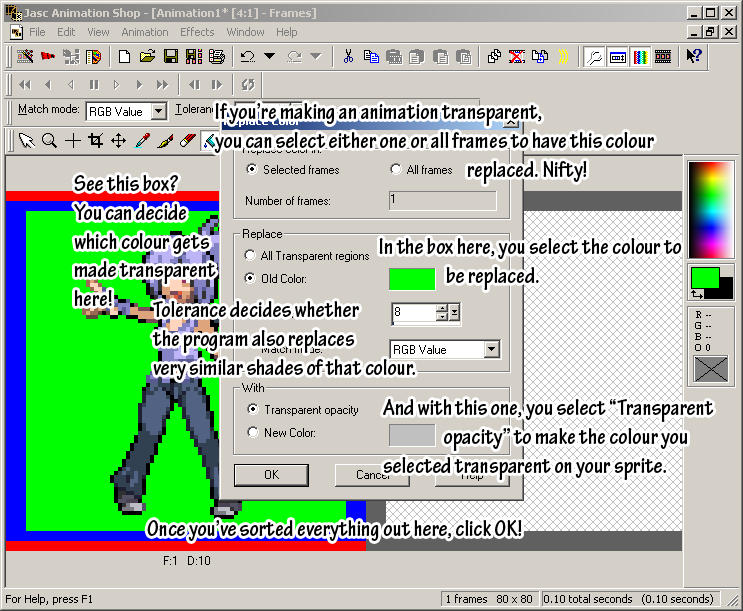
To further explain the Tolerance value: the higher it is, the more similar shades are replaced. The lower it is, the less. For sprites, you're best setting it to 1 - this means the colour you select, and that colour and exact shade only, will be the only colour to be replaced. Mine happens to be on 8 by default, but since my sprite is mostly blues, and I selected a green background, it doesn't really matter too much.
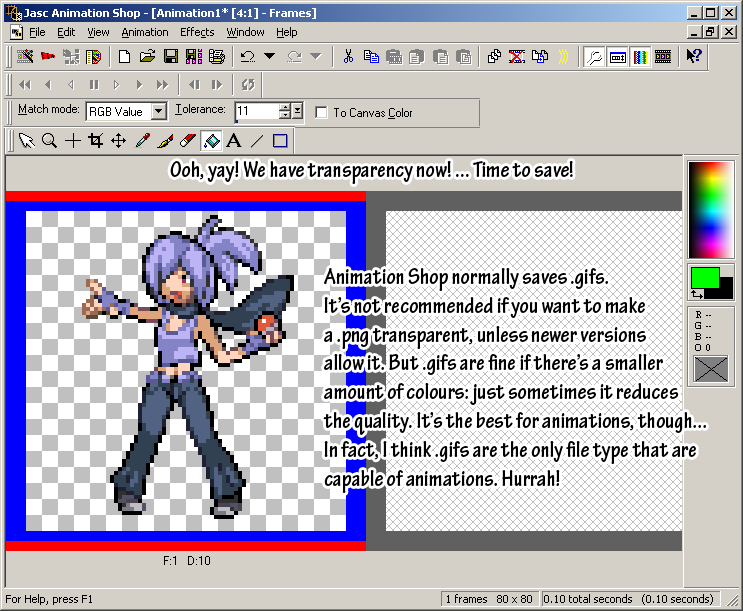
The resulting sprite is here:

Keep in mind, however, that the only filetypes you can use when making a transparent image is .gif and .png, and .png is favoured, especially if you're submitting to the Trainer Card Maker.
And there's the Animation Shop tutorial concluded. Animation Shop is one of the easiest programs to use for making animated sprites that are also transparent. However, my favourite program, Adobe Photoshop, comes next - watch this space!
Animation Shop's trial version is available from Jasc's website. I'm not sure if it'll allow the feature I use to add transparency as I have the full version. But, let's see what we can do with this! We'll start off with the interface, like with The GIMP.
I don't know if the interface has been updated recently, but I use version 3.

Once you've got your sprite in there, you'll have it up, and it'll look a bit like the following...

The best way of making things transparent in Animation Shop is to use the Replace Colour tool. But keep in mind that when you do this, it replaces every instance of a colour on the image. So that's why I selected the green - it's not used on my actual sprite, so it's safe to make a transparent background with!

The next step is to use the Replace Colour tool, in the Animation option. You'll get an option box come up when you click it:

To further explain the Tolerance value: the higher it is, the more similar shades are replaced. The lower it is, the less. For sprites, you're best setting it to 1 - this means the colour you select, and that colour and exact shade only, will be the only colour to be replaced. Mine happens to be on 8 by default, but since my sprite is mostly blues, and I selected a green background, it doesn't really matter too much.

The resulting sprite is here:

Keep in mind, however, that the only filetypes you can use when making a transparent image is .gif and .png, and .png is favoured, especially if you're submitting to the Trainer Card Maker.
And there's the Animation Shop tutorial concluded. Animation Shop is one of the easiest programs to use for making animated sprites that are also transparent. However, my favourite program, Adobe Photoshop, comes next - watch this space!
[size=30pt]Photoshop Tutorial[/size]
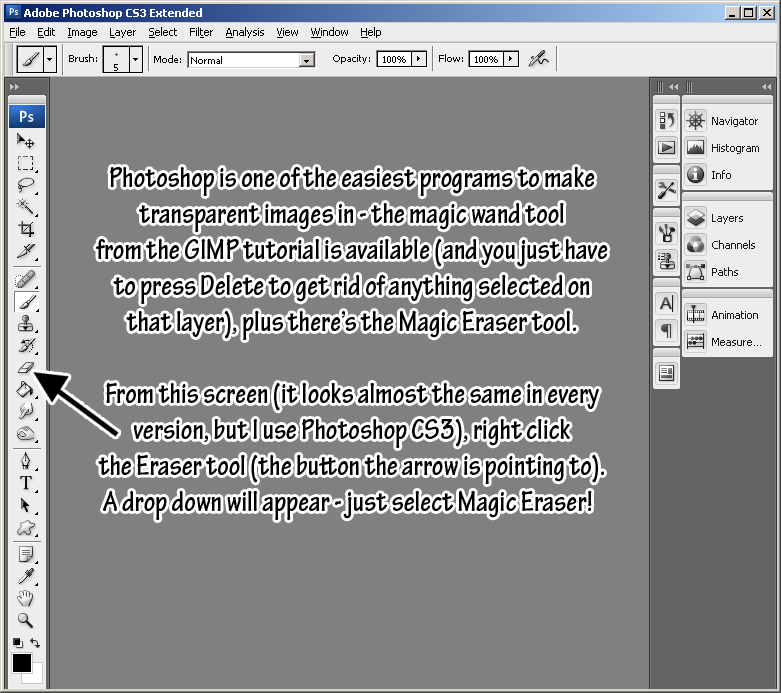
I finally got this one done! Woohoo! It's fairly simple, mostly shown in the screenshots. Sorry that they're so text-heavy.
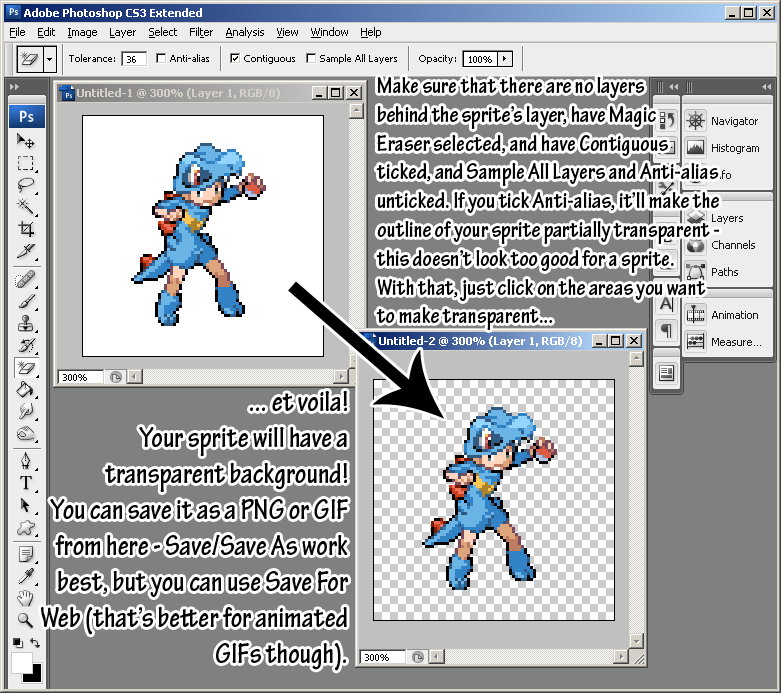
Finished product:

And there we have it. I may go through other programs some day, but these are my main three.
I finally got this one done! Woohoo! It's fairly simple, mostly shown in the screenshots. Sorry that they're so text-heavy.


Finished product:

And there we have it. I may go through other programs some day, but these are my main three.
[size=30pt]Paint Shop Pro Tutorial[/size]
Artiste was kind enough to write/screengrab a Paint Shop Pro tutorial for making sprites transparent - click here to be taken to the post with it. Or scroll down in the thread.
Toodles for now!
Artiste was kind enough to write/screengrab a Paint Shop Pro tutorial for making sprites transparent - click here to be taken to the post with it. Or scroll down in the thread.
Toodles for now!

 I think this needs a sticky.


