The Basics of Spriting
This is just a little tutorial on some of the basic skills required to sprite. I decided to use splicing for the tutorial as it is easy to do and easy to show the skills in their use.
First up, we’re going to paste the two sprites we want into an empty Paint file. This is the newer version of paint that is in Windows 7, but the old Paint will work just as well. Another program you could use for if you have a Mac or something is Paint.Net.
You can find the sprites you want using this sprite sheet. I have chosen Spoink and Aipom for this splice. When you’re working with a sprite, it’s a good idea to zoom in so that you can work with all of the tiny pixels.
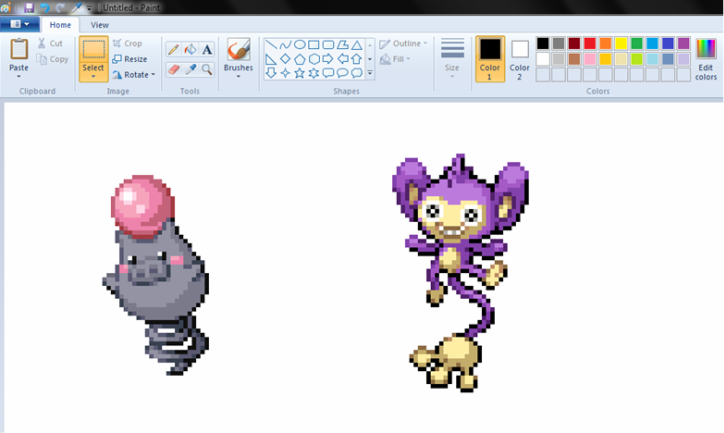
The first thing to do is grab the colour schemes off both of them. You can grab the individual colours by using the eye dropper tool. It’s a good idea to put the colours in an orderly fashion. In row of brightest to darkest for each scheme.
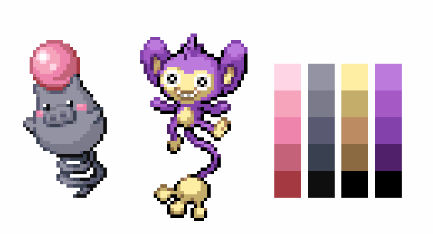
The colours aren’t going to be used for a while, so you can just push them to the side until later.
Before I go ahead any further I would just like to say that while you are spriting you should save regularly, make a copy of your sprite before you edit anything and FOR THE LOVE OF GOD do not save it as a jpg.
Time to start the splice! First up, we have to choose which one of two is going to be the base. In this case, I chose Spoink because of his round and therefore easy to work with body. I made a copy of Spoink and chose the first feature to change; the tail. I removed the tail from Spoink and made a copy of Aipom’s tail. Whenever you grab a feature of a sprite, whether it be a tail or an ear, make sure to delete all pixels not from that feature so that there aren’t any stray pixels in the finished product.
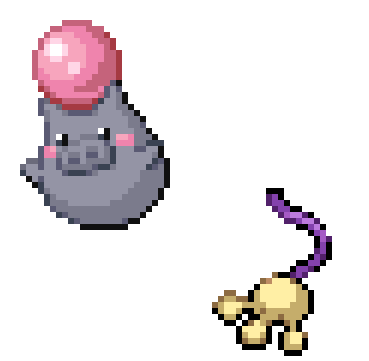
To put Aipom’s tail on Spoink, I first turned on the transparency on the selection tool.
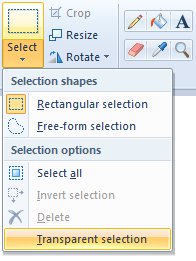
(You can do this in the old Paint by using the
 button.) This makes it so that you can select all colours except for the one in the second colour box. This means that if the colour in the second colour box is white and I selected Spoink and the white surrounding him, it would only select Spoink so he can easily be placed over other things without dragging the white over as well.
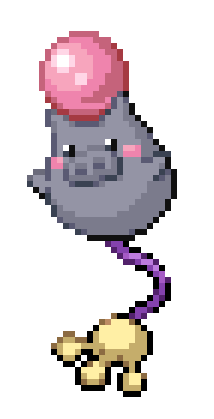
Next up, I moved the face of Aipom on to Spoink. When working with faces, it’s a good idea to change the colour of the background to one that isn’t being used in the sprites. This is so that the white in the teeth and eyes is selected when using the transparent selection. The same thing should be done for Pokemon that have lots of white in them like Absol or Swablu. To prepare for the face change, I painted over Spoinks facial features with the appropriate shade and isolated Aipom’s face.
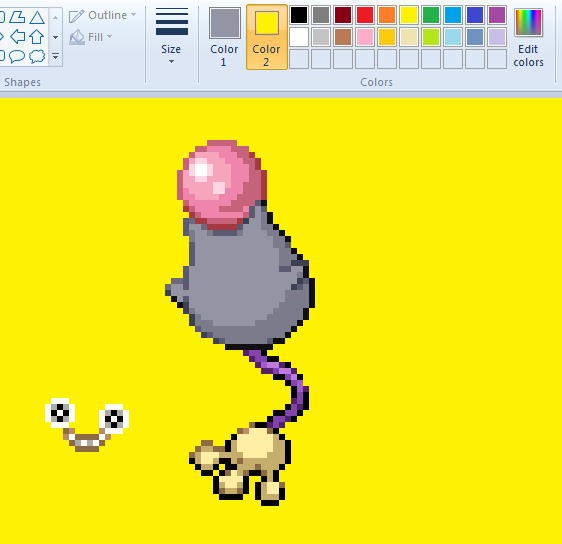
Sometimes when you’re spriting, there’s just no way that you can get something looking natural. Here is a good example of this.
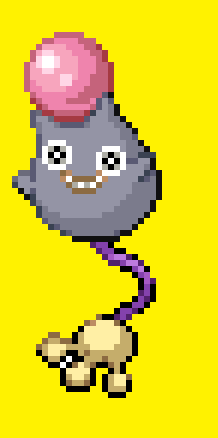 Herp Derp
The problem is that the face is not in the correct angle. If something like this happens, you need to tweak the feature until it looks its best. There are many things that you can use to tweak a feature such as stretching out a feature and editing the stretch lines to make it look natural or using rotations or flips.
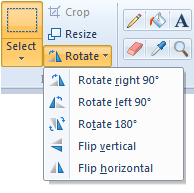
In the old Paint, I believe you do this by going Edit -> Rotate/Flip while selecting what you want to alter. A problem that comes up sometimes while doing this is that you get the feature right, but it screws up the shading. If something like this happens it’s actually quite easy to edit it using only the pencil and eye dropper tools. After I altered the face, it looked like this.
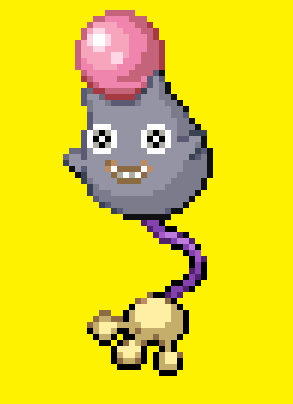 D’aww~
After this I just used some of these previous methods to add legs.
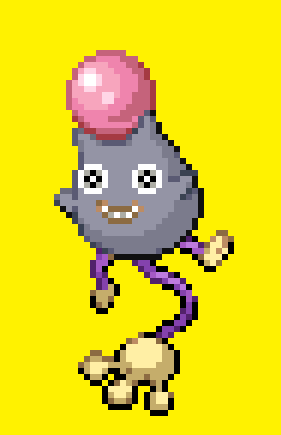
It was at this point that I decided to swap over the colour schemes. To do this you need to go grab the colours from before and choose which pallets you want to swap. In this case I was changing all of Spoink’s grey shades for Aipom’s purple shades. I selected the lightest colour in the purple pallet (the one that was replacing) as colour 2 and the lightest shade of grey (the one that was being replaced) in colour 1.

After this I selected the eraser tool and held down the right mouse button so that it only erased the grey and nothing else. This is a very handy tool when spriting, as it quickly changes the colours, a lot faster than if you were to use the pencil or pain bucket tools. Once I finished the grey, I went on and changed Aipom’s yellow to Spoink’s pink. In the end it looked like this.
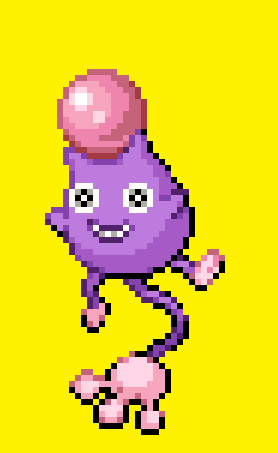
Now if I wanted to, I could have stopped right there and it would have been fine, but I decided to go one step further and change a bit more. I started off with using the pencil and eyedropper to edit out Spoink’s arms and use the transparent selection to add Aipom’s. I then used the pencil and eyedropper to add in Aipom’s face fur. I also moved the eyes a bit.
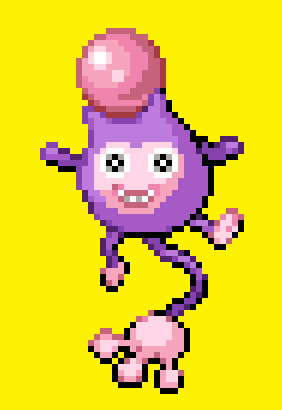
I did all this because in spriting, you need to go the extra yard if you want to make a name for yourself. (That was cheesy.) After I finished the sprite, I changed the background back to white and placed it in the standard 80x80 box.

If you want to, you can make the background transparent using this tutorial.
So there you have it. Those are the basics of spriting. Once you’ve gained confidence in these skills you can go out and make anything you want from trainer sprites to even scratched sprites. Here is a list of some successful spriting threads that might inspire you.
Teh Shiny Sprites of Tun .:The Home of PokePlush™:.
Windsaver's Sprite-Home of The Famous Blockymon
Tasty Toasted Sprites
A Pixel of [X5]
Sprites n’ Stuff
Trainer J’s Sprite Place
Jeyjey’s Art Request
Jappio's Supposedly Awesome Sprites
There's also a good tutorial made by Tun on how to do trainer sprite called Tun's Trainer Sprite Tut c:
So keep at it!
This is just a little tutorial on some of the basic skills required to sprite. I decided to use splicing for the tutorial as it is easy to do and easy to show the skills in their use.
First up, we’re going to paste the two sprites we want into an empty Paint file. This is the newer version of paint that is in Windows 7, but the old Paint will work just as well. Another program you could use for if you have a Mac or something is Paint.Net.
You can find the sprites you want using this sprite sheet. I have chosen Spoink and Aipom for this splice. When you’re working with a sprite, it’s a good idea to zoom in so that you can work with all of the tiny pixels.

The first thing to do is grab the colour schemes off both of them. You can grab the individual colours by using the eye dropper tool. It’s a good idea to put the colours in an orderly fashion. In row of brightest to darkest for each scheme.

The colours aren’t going to be used for a while, so you can just push them to the side until later.
Before I go ahead any further I would just like to say that while you are spriting you should save regularly, make a copy of your sprite before you edit anything and FOR THE LOVE OF GOD do not save it as a jpg.
Time to start the splice! First up, we have to choose which one of two is going to be the base. In this case, I chose Spoink because of his round and therefore easy to work with body. I made a copy of Spoink and chose the first feature to change; the tail. I removed the tail from Spoink and made a copy of Aipom’s tail. Whenever you grab a feature of a sprite, whether it be a tail or an ear, make sure to delete all pixels not from that feature so that there aren’t any stray pixels in the finished product.

To put Aipom’s tail on Spoink, I first turned on the transparency on the selection tool.

(You can do this in the old Paint by using the


Next up, I moved the face of Aipom on to Spoink. When working with faces, it’s a good idea to change the colour of the background to one that isn’t being used in the sprites. This is so that the white in the teeth and eyes is selected when using the transparent selection. The same thing should be done for Pokemon that have lots of white in them like Absol or Swablu. To prepare for the face change, I painted over Spoinks facial features with the appropriate shade and isolated Aipom’s face.

Sometimes when you’re spriting, there’s just no way that you can get something looking natural. Here is a good example of this.

The problem is that the face is not in the correct angle. If something like this happens, you need to tweak the feature until it looks its best. There are many things that you can use to tweak a feature such as stretching out a feature and editing the stretch lines to make it look natural or using rotations or flips.

In the old Paint, I believe you do this by going Edit -> Rotate/Flip while selecting what you want to alter. A problem that comes up sometimes while doing this is that you get the feature right, but it screws up the shading. If something like this happens it’s actually quite easy to edit it using only the pencil and eye dropper tools. After I altered the face, it looked like this.

After this I just used some of these previous methods to add legs.

It was at this point that I decided to swap over the colour schemes. To do this you need to go grab the colours from before and choose which pallets you want to swap. In this case I was changing all of Spoink’s grey shades for Aipom’s purple shades. I selected the lightest colour in the purple pallet (the one that was replacing) as colour 2 and the lightest shade of grey (the one that was being replaced) in colour 1.

After this I selected the eraser tool and held down the right mouse button so that it only erased the grey and nothing else. This is a very handy tool when spriting, as it quickly changes the colours, a lot faster than if you were to use the pencil or pain bucket tools. Once I finished the grey, I went on and changed Aipom’s yellow to Spoink’s pink. In the end it looked like this.

Now if I wanted to, I could have stopped right there and it would have been fine, but I decided to go one step further and change a bit more. I started off with using the pencil and eyedropper to edit out Spoink’s arms and use the transparent selection to add Aipom’s. I then used the pencil and eyedropper to add in Aipom’s face fur. I also moved the eyes a bit.

I did all this because in spriting, you need to go the extra yard if you want to make a name for yourself. (That was cheesy.) After I finished the sprite, I changed the background back to white and placed it in the standard 80x80 box.

If you want to, you can make the background transparent using this tutorial.
So there you have it. Those are the basics of spriting. Once you’ve gained confidence in these skills you can go out and make anything you want from trainer sprites to even scratched sprites. Here is a list of some successful spriting threads that might inspire you.
Teh Shiny Sprites of Tun .:The Home of PokePlush™:.
Windsaver's Sprite-Home of The Famous Blockymon
Tasty Toasted Sprites
A Pixel of [X5]
Sprites n’ Stuff
Trainer J’s Sprite Place
Jeyjey’s Art Request
Jappio's Supposedly Awesome Sprites
There's also a good tutorial made by Tun on how to do trainer sprite called Tun's Trainer Sprite Tut c:
So keep at it!


